Showing posts with label vintage. Show all posts

Saturday, April 14, 2012

When the first draft is the final draft!

{front}
 While I am working (my real job) and have some mental downtime, I sometimes work through how to create a pattern in my head. One of the reasons I like sewing, is that it is mentally stimulating for me and allows me to creatively problem solve.  Being a visual thinker, I can sometimes mentally take apart something I want to make and work through the whole pattern making/sewing process before I cut into fabric. 

I have seen plenty of these cute round bottom clutches with flaps around the internet and thought they were adorable.  Most of what I have seen, only had a magnetic or button closure at the flap.  That didn't seem practical for me.  One toss into the back seat of my car would result in lost lip gloss and phone.
{flap completely covers the zipper and is secured with a hidden magnetic clasp}

 I wanted to add a zipper, but still have it follow a slight curve at the top of the bag.  So after a week of thinking through this process, I sat down over lunch on a Friday and wrote out everything that was floating around in my head.  That night I decided to use a vintage calender towel to make a first draft.  I first drew out my pattern on paper, trued up all my drafting, and cut into the fabric.  One towel and fat quarter of cotton was more than enough to make this sweet clutch/wristlet.

{back}
 I have been successful at finding some great thrift store purses (half off Wednesdays!!) to reuse for their leather, handles, zippers, and hardware. I reused the small D-ring and clasp from a $.50 purse to quickly turn this clutch into a wristlet.
{interfaced black and white printed gingham for the interior.  and a slightly crooked magnet sewn in.}
It is a simple little design, but I was smitten with myself when the first draft was exactly what I imagined in my head.  I by no means designed a completely original purse (these little round bottom purses seem to be a dime and dozen now) but this purse was a great exercise for my mind.  Continually building a foundation of knowledge that leads to me to be more creative and flexible in other areas of my life. What a great hobby!

Thursday, April 12, 2012

Scrappy Goodness

 This ol' blog might not show it, but I have been keeping myself busy with some sewing projects lately.  Less than a month ago I hosted a baby shower for my SIL who is expecting a little girl this May.  Is there anything better than sewing for little girls?!  ***As a side note- I picked up several yards of clearance Lisette cotton lawn (Spring 2011 collection) from JoAnn's earlier this spring.  I have three little nieces to sew {matching}summer dresses for!***

Ok, back on topic.... sewing for the baby shower.  Waaaaay back in Sept 2008, I participated in a vintage fabric swap.  I think the premise of the swap was to cut through our stash of vintage bed linens and make 6xx6 inch squares, bundle them together and mail them out.  I wish I would have noted more detail about the swap in my post, because I know some amazing woman collected, sorted, and remailed everyones loot. But, hey, that was like FOUR YEARS AGO!  Where did that time go? Seriously.  Anyways, some of the blocks were passed along, others I kept and when it came to making a baby blanket I immediately remembers this great stack of blocks!  I rummaged through my own vintage scrap pile to cut a dozen more blocks and sewed this together in an evening.
 I was so smitten with myself when I finished piecing the top!  So girl-y and spring-y! And I had the perfect backing thanks to a wonderfully sweet and generous blog reader/customer of mine.  She was cleaning out her closets and found these older sheets and sent me a box to see if I could use them instead of throwing them away (If you are reading this now, THANK YOU AGAIN!).  A green and white gingham was the perfect piece to pair with the front.    To finish the quilt I sewed right sides together and turned it.  I top stitched the outside edge.  Instead of tying the quilt with yarn, I found a neat little stitch on my Pfaff 2038 that bound the quilt together.  I stitched a little pink diamond in the middle of each 6x6 square. 

And after I had finished the entire quilt, I had this nagging thought that someone might be grossed out that I cut up old bed sheets and made a blanket out of them.  I mean, not everyone is cool like my readers or fellow seamstresses.  The blanket was well received and I know it will get plenty of play time when the baby is born, but what are your thoughts on reusing certain vintage fabrics for new-er sleeping items? 

Tuesday, April 3, 2012

WIP- Vintage Feedsack Cross Quilt


Sewing has been sporadic as best lately. And now that the weather is definitely heading in the direction of spring, my sewing days are even more numbered!  But I wanted to document the start of this quilt so in like 5 years when I am finishing it up, I have a date to refer back to. That is what a blog is for right?  To show how slow I am in completing things? :)  Two years ago I was given a bag of feed sack scraps.  I knew then I wanted to turn them into a beautiful scrappy quilt.  But what do I pair this vintage fabric with? Any modern fabric didn't match the weave of the older scraps.  I thought I would find some old white feed sacks and use the two together.  I did find and collect those feed sacks but I love the prints on them so much I want to feature them in their own project.
 

 Then early this winter I was "cleaning" my sewing room (basically re-stacking fabric from one spot to another) and I found a stash of linen garments I picked up at the thrift store.  Well worn, well washed.  The texture of the fabric was a perfect pairing to the pretty vintage prints.  This was the solid I was looking for!


I've had my eye on making a "cross" quilt for a long time.  Most of my feed sack scraps are the negative cuts from someone making clothes and crafts, so this block allows me to use every scrap I can cut a 2''x2'' square from.  The best part about this project, beyond the visual prettiness, is that I finally purchased my first rotery cutter and mat.  Love, love, love. Such a nice tool for making quilts. I am hoping this quilt fits a queen bed. Right now, I am not thinking about how many 6.5'' blocks I need to make to get that done.  Just one block at a time.

Friday, February 17, 2012

Before and After- Corner Cabinet

This project was a long time coming.  I purchased this cherry cabinet at an auction two years ago with the best of intentions.   I had been looking for a corner cabinet since we moved into our house, but I couldn't find one I liked for less than $200.  I paid $70 for this one, but it had one huge strike against it.  It came from a smoking home.  I thought with scrubbing, sunshine, and time I could get it cleaned up.  No dice.  Then I decided paint would cover it up. All last year I had been reading about Annie Sloans Chalk Paint.  I was even able to buy it locally at a store in MD called Repurposed and Refined to save on shipping!   This paint is expensive. But with all the claims of no sanding, no priming and one coat coverage I thought why not!  I could get this project done in a weekend!

 Let me also make the disclaimer that I have only painted a handful of furniture and I am not claiming that I am any good at it.  Also, I searched around on the internet for some quick how-tos, read through the product website, and got some pointers from the vendor of the paint.  I fell in love with the idea of painting the inside a fun bright color.  I have seen a few vintage cupboards/cabinets painted on the inside and felt like it would work for this project.  I was immediately smitten with Antibes Green for the inside.  In my opinion, this is the perfect spring green color.  For the exterior I choose Old White and used a clear wax to finish it. 

 I used my 2'' Purdy brush to paint the entire piece.  Because of the smoke issue I knew I needed to cover every square inch with paint to seal it up.  I used an entire quart of green to paint the inside.  It took two coats to get it looking even.  In the photo above, you'll see what one coat will look like covering a cherry finish.  Very streaky.  The exterior also has one coat.  The white had much better coverage, but if you look closely I got an unexpected crackle finish.  I was a bit upset at first.  It wasn't the look I was going for.  The crackle appeared almost immediately.  My best guess is the paint interacted with the nicotine.  There is no cracking on the inside or where the doors had been closed.  By the time I had finished painting the exterior my first brush strokes were dry.  So I got out some fine grit sandpaper and sanded a portion to see if a second coat would cover the crackle. I packed up for the night and the next day everything got a second coat.  The crackling was still there but not as apparent.  I applied two coats of wax and put the whole thing together. 
 Once in the house, I loved how the cabinet filled the room!  I love how my white and silver dishes pop with the green.  The hand blown glass on the top shelf doesn't stand out as much as I'd like, but I'll have to come up with a different display for them.  The freshness of the green makes me very happy! 

I did a very light distressing with a sanding block and came to terms with the crackle finish.  Overall, I do love the results.  I didn't expect to use the amount of paint I did, but the results are great.  The green is vibrant.  The Old White is a soft white with no yellow. It distressed beautifully and the wax was easy to apply (I used a lint free rag.)  What I wasn't expecting is that the cabinet still has a faint smoke smell.  Total disappointment. My husband has a more sensitive sniffer than I do, but there is no mistaking it when you open the doors.  And after sitting in the house for 4 months I decided it can't stay. :(  I'm really bummed.  There is the whole financial loss of the project and then having the whole experience not meet my expectations.  I'll list it on craigslist.  Maybe I can get some money back on it and start the search for something else.  You only need one buyer right?!

Friday, March 11, 2011

Thrift Find- Book Storage

A few weeks ago I posted about my theme for this year: Everything has a place. The lovely little book shelf my husband brought home was enough space for our ever growing collection of food related books, but we still had a plethora of other books to contend with. The formerly formal dining room in our home is an dumping ground for things we don't know what to do with. It has a recliner my husband doesn't like to sit in, an odd table, boxes of magazines, and a hanging chandelier that people can bump their heads on.

This room will grow as our family grows. I can imagine we'll gate this space off for future kiddos and then it will become the reading/homework room and the family computer will eventually reside in here. But for now it'll hold our newest book storage solution!

Isn't she lovely?! I found her at a local used furniture place. Actually "the place" is more like a steel Morton building with no heat that I was scavenging around in the middle of a January snow storm. But totally worth it! She's solid walnut and in good condition. The top portion is removable. When I saw her in the barn I called my husband (at work) to tell him how much I liked her. I had to give my disclaimer that this piece was more my style of furniture, but if he trusts me I know some minor tweaks would bring her to out of the 70's and into our home. (Now how could he not trust me!) So I put the money down, traded some babysitting for a friend to haul her home for me and there she sits. Eventually we'll put built in bookcases in this corner for a library effect, but for $150 I think I got an excellent deal. You can't buy a good Target bookshelf that won't sag for under that.

I promised my husband I would switch out the hardware and replace the woven thatch in the side panels. The hardware will be easy, the thatch is another thing. At first I thought it would pop right out and I would use it as a template for its glass replacement. Then we could see the books lost in the far right and left portions of the shelves. But its glued onto a solid piece of wood that runs underneath the trim. Hmmm. I may need someone with more knowledge to help me remove it.

The bottom portion holds all of our board games, odd household papers and some DVDs. I thought for sure the drawers would be able to store all our DVDs but the cases are 1/8'' to high! If they did fit, it would have been perfect.

Wednesday, March 2, 2011

Sofa Progress!

She's down to her undergarments! It is a serious misnomer that upholstery is a sewing project. It's not. It's about thousands upon thousands of staples! I won't go as far to say if you can work a stapler than you can complete this task, but it may not be far off. When I first started working on this sofa I really never thought about the piece as one gender or another. But as I spend countless hours working over every inch of its surface, I started referring to "it" as a "her". She's fit, she's classy, and when I'm done with her I think I'll call her Chanel.

Sunday, January 23, 2011

Hand sewn

Did I ever tell you guys that I acquired a 17lb bag of feed sack scraps this summer? I'll have to take a picture sometime. I still am an awe every I look at it. I have plans to turn much of it into a quilt, but that will take some time. Many pieces are the negatives of previous clothing patterns. So every time you hear someone tell you about a time when their mothers made them clothes out of old feed sacks, I have the "extra parts".

A few weeks ago I sorted through the bag again and found some tiny scraps. I washed the small pieces with Eucalan in the sink. (I also use this product to wash all my wool and cashmere sweaters. I love it.) I was in desperate need of a sewing fix, so I grabbed the newly washed scraps and some linen and took it with me while I babysat for a friend one evening.


I don't really have a plan for these. ^The one above^ may be turned into a pendant. Or maybe I'll add a hair clip and use it when I put my hair up. I left enough linen around each one so I could also sew then up in little pouches. But either way, they make me extremely happy! I have to research rules for air travel. I have a business trip coming up and the destination is half way across the country. So lots of time at the airport and on airplanes. Wouldn't it be nice to take this project along with me? But I can't imagine they'll allow small clippers/scissors or needles as a carry on. I might better stick with a book and my iPod.

**EDIT (1/24/11)** Looks like it's my lucky day! Check out the TSA's rules for Transporting Knitting Needles and Needlepoint.

Which reminds me... what podcasts do you listen to? I'm a big fan of anything public radio, so I already subscribe to many of them. But I don't know of any related to sewing.

Sunday, July 4, 2010

Nesting

Making my house a home one used piece of furniture at a time....

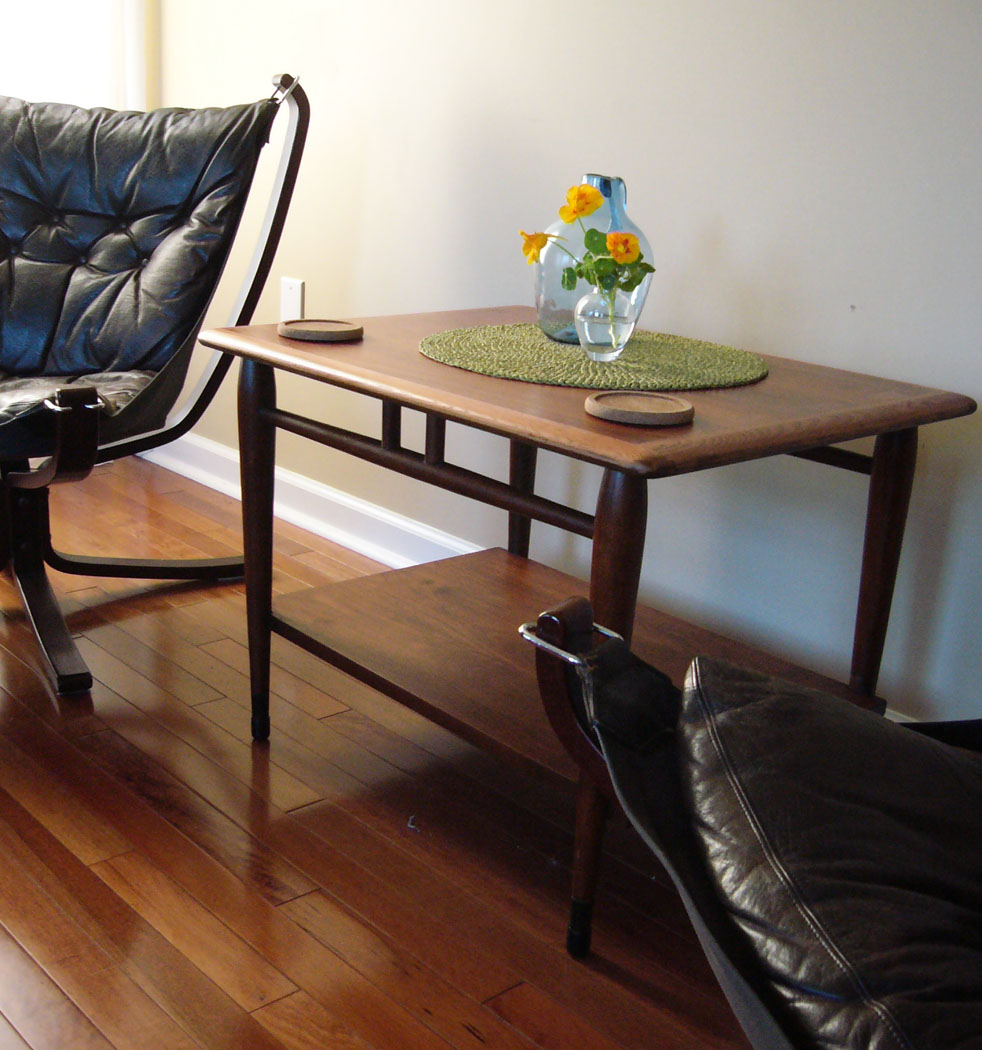
Picked this lovely end table up during a First Saturday event in downtown Frederick, MD this weekend.

Solid wood with a midcentury modern feel. Dove tail inlays. Perfect condition.

Not a bad replacement to the old kitchen table chair we were using. Twenty three dollars and eighty five cents well invested I'd say!

Sunday, February 7, 2010

24 inches of snow

We are snowed in again! It's been a long time since I've seen this much snow. Even the snow we got in Dec was peanuts compared to this. We tried to get the cars out today but no luck. Having a long driveway is awesome 98% of the time. This is not one of those times. Hopefully our drive will be plowed tonight and then we'll see if we can get the Prius up the hill. *crossing fingers*

But since we couldn't go anywhere I sewed up my only V-day decoration. Made completely with scraps it was quick and easy. I was testing how it would hang before I sewed on the homemade bias tape. I guesstimated the measurements so I was pleased when it actually worked out.

I was alsot creative in the kitchen when making my own decaf herbal tea which included fresh orange zest, fresh ginger, cardamon, and lemon grass.

I cleaned up the counters and set up a collection of vintage glass made exclusively from the small towns dotting southern NJ. (Well, all except the small clear bud vase.)

And my amaryllis planted Christmas Day is in full bloom! I love fresh flowers in the house!

Tuesday, December 29, 2009

After Xmas Vacation

(Vintage bark cloth with contemporary navy blue polka dot. Fawn applique drawn by me.)

I am on vacation all this week. So I am getting a lot of the pesky "to-do's" crossed off my list. One of those items was downloading pictures from the camera. The bag pictured above is a recent favorite. It was the first one that sold at my recent craft show. Good thing I thought ahead and I have another one cut out ready to sew. :)

(I miss summer! I've ordered my Burpee catalog this week. December isn't even over with and I am already itching for spring!)

I forgot all about these beautiful red pepper. Friends of ours gave them too us at the end of summer. I am not a huge fan of peppers, but I do like roasted red peppers in several recipes. So I spent the time and roasted them all up. Then stored them in the fridge covered in olive oil. And then they molded. That was crap.

(oh, baby!)

And this is the project I started today! I got this vintage flexsteel sofa from my in-laws basement. The cushions are trash. They have completely deteriorated into nasty dust. This week I had planned to visit a localish fabric distributor to pick out upholstry fabric, but don't you know they are also taking a vacation the exact same time I am! What a bummer! But I am pushing ahead regardless. Today I started making a muslin pattern to use for the tailored slipcover I am planning to make for it. So far so good. Tomorrow I finish the test cover and order a new cushion. I can't wait til this is finished!